Channels Screen
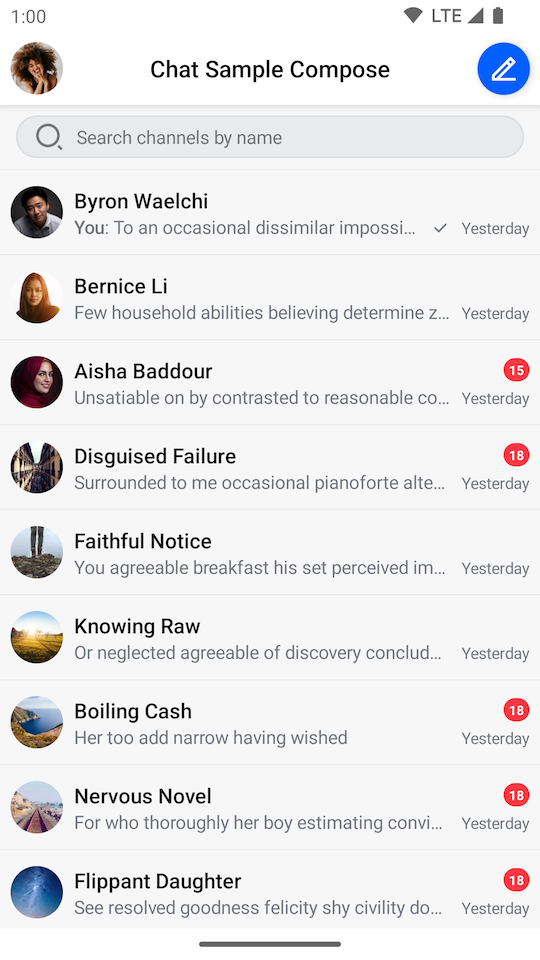
The easiest way to set up a screen that shows the active user's channels and gives them the ability to search for a specific channel is to use the ChannelsScreen.
ChannelsScreen sets up the following functionality internally:
- Header with the information of the current user and customizable title and action.
- Search input that can be shown or hidden that allows users to search for channels by name or message text.
- List of user's channels with pagination, based on defined filters and sorting.
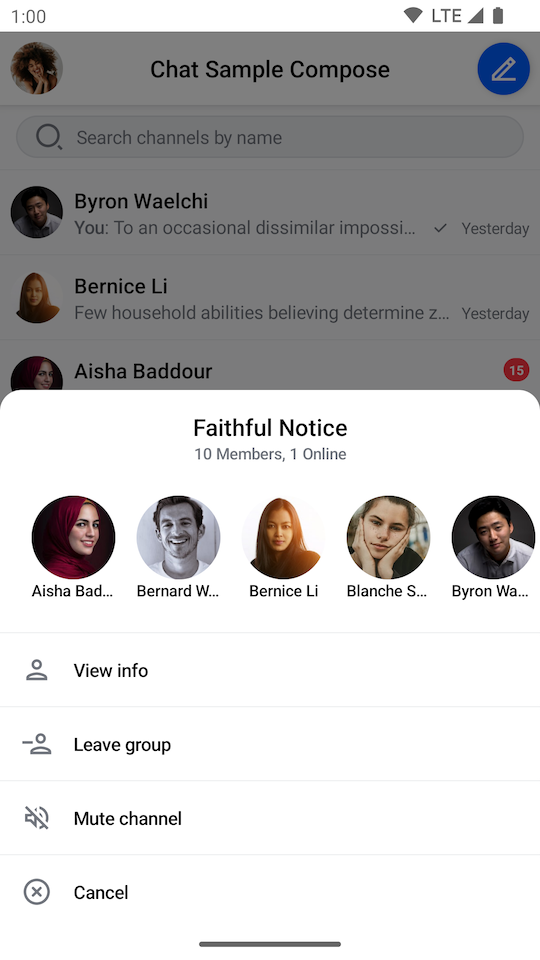
- Menu with detailed channel information, shown when long clicking on a
Channelin the list.
It also sets up all the business logic and styles the UI according to our default design system.
Let's see how to integrate the component.
Usage
To use ChannelsScreen, you just need to call it within setContent() in your Activity or Fragment:
override fun onCreate(savedInstanceState: Bundle?) {
    super.onCreate(savedInstanceState)

    setContent {
        ChatTheme {
            ChannelsScreen()
        }
    }
}
The ChannelsScreen can be used without any parameters, but we advise that you pass in the title of your app, as well as the action handlers.
This small snippet will produce a fully working solution, as shown in the image below.
 |  |
|---|
To get a better feel of the component, you'll want to customize its actions.
Handling Actions
When it comes to action handlers exposed in the ChannelsScreen signature you have access to the following:
fun ChannelsScreen(
    ..., // ViewModel factory and UI customization
    onHeaderActionClick: () -> Unit = {},
    onHeaderAvatarClick: () -> Unit = {},
    onChannelClick: (Channel) -> Unit = {},
    onSearchMessageItemClick: (Message) -> Unit = {},
    onViewChannelInfoAction: (Channel) -> Unit = {},
    onBackPressed: () -> Unit = {},
)
There are several action handlers you can use with the ChannelsScreen:
onHeaderActionClick: Handler for the default header trailing icon click action.onHeaderAvatarClick: Handler for the clicks on the user avatar in the header.onChannelClick: Handler for aChannelbeing clicked.onSearchMessageItemClick: Handler for aMessagebeing clicked.onViewChannelInfoAction: Handler for the View info action selected inSelectedChannelMenu.onBackPressed: Handler for the system back button being clicked.
All of these actions are empty by default, but if you want to customize them, you can do the following:
override fun onCreate(savedInstanceState: Bundle?) {
    super.onCreate(savedInstanceState)

    setContent {
        ChatTheme {
            ChannelsScreen(
                onChannelClick = {
                    // Open messages screen
                },
                onSearchMessageItemClick = {
                    // Open messages screen and scroll to the message
                },
                onHeaderActionClick = {
                    // Handle the header click action
                },
                onHeaderAvatarClick = {
                    // Handle the header avatar clicks
                },
                onViewChannelInfoAction = {
                    // Show UI to view more channel info
                },
                onBackPressed = { finish() }
            )
        }
    }
}
Overriding the ViewModels
In case you want to control the logic when using the ChannelsScreen, you can do so by providing a ChannelViewModelFactory that you use to build the respective ViewModels yourself.
Here's an example:
class ChannelsActivity : AppCompatActivity() {

    // 1
    private val factory by lazy {
        ChannelViewModelFactory(
            chatClient = ChatClient.instance(),
            querySort = QuerySortByField.descByName("last_updated"),
            filters = null
        )
    }

    // 2
    private val listViewModel: ChannelListViewModel by viewModels { factory }

    override fun onCreate(savedInstanceState: Bundle?) {
        super.onCreate(savedInstanceState)

        setContent {
            ChannelsScreen(
                viewModelFactory = factory // 3
            )
        }
    }
}
There are a few steps here that allow you to override and control the ViewModels:
- You create the
ChannelViewModelFactoryyourself, which lets you describe the data and configuration used to build theViewModels. - You lazily create an instance of the
ChannelListViewModel. This means that you'll either build theViewModelfirst and then pass it to the Compose component, or your Compose component will create theViewModeland you'll get access to it here. - You pass in the factory to the
ChannelsScreen, which allows this connection to happen.
The ViewModels should be the same and you should easily be able to react to things like item clicks, changes in the state and more.
Even though ChannelsScreen offers limited customization, you can still achieve a unique look and feel by modifying ChatTheme parameters.
For more information on how to do so read our Customizing Components page.
Customization
ChannelsScreen is one of our screen components and as such it doesn't offer much customization. As with any component, you can customize the content theme and styling by wrapping it in the ChatTheme.
When it comes to UI and behavior customization in the ChannelsScreen signature you have access to the following:
fun ChannelsScreen(
    viewModelFactory: ChannelViewModelFactory = ChannelViewModelFactory(
      ... // Params
    ),
    title: String = "Stream Chat",
    isShowingHeader: Boolean = true,
    searchMode: SearchMode = SearchMode.None,
    ... // Action handlers
)
viewModelFactory: The factory that you build yourself, if you want access toViewModelsfor custom behavior. This lets you control not just the way theViewModels are built, but also their lifecycle, as you can share them between components. You can also customize its parameters to affect the behavior of the screen.title: The title of theChannelListHeader.isShowingHeader: Flag that affects if we show theChannelListHeader.trueby default.searchMode: SearchMode to be configured for theSearchInput.SearchMode.Noneby default. It can take the following values:SearchMode.None: Hides the search input.SearchMode.Search: Shows the search input.SearchMode.Filter: Shows the filter input.SearchMode.SearchAndFilter: Shows both the search and filter inputs.
If you want to build a completely custom channel list, follow our Custom Channel List Cookbook recipe.